Permissions and Authorization
In Django, "permissions" and "authorization" are two closely related concepts that play a crucial role in controlling access to resources and actions within a web application.
Permission
full-version/, if you wish to integrate it in starter-kit/ you can follow this documents and integrate it.- Permissions are tied to specific models in Django, and they define actions such as viewing, adding, changing, or deleting objects of that model. For ex:
view: Allows users to view objects of a model.add: Allows users to create (add) objects of a model.change: Allows users to modify (change) existing objects of a model.delete: Allows users to delete objects of a model.- Permissions can be assigned to user groups or individual users.
Default permissions
The default permissions will be created for all previously-installed models, as well as for any new models being installed at that time. Afterward, it will create default permissions for new models each time you run
manage.py migrate. For more details refer
Default Permission
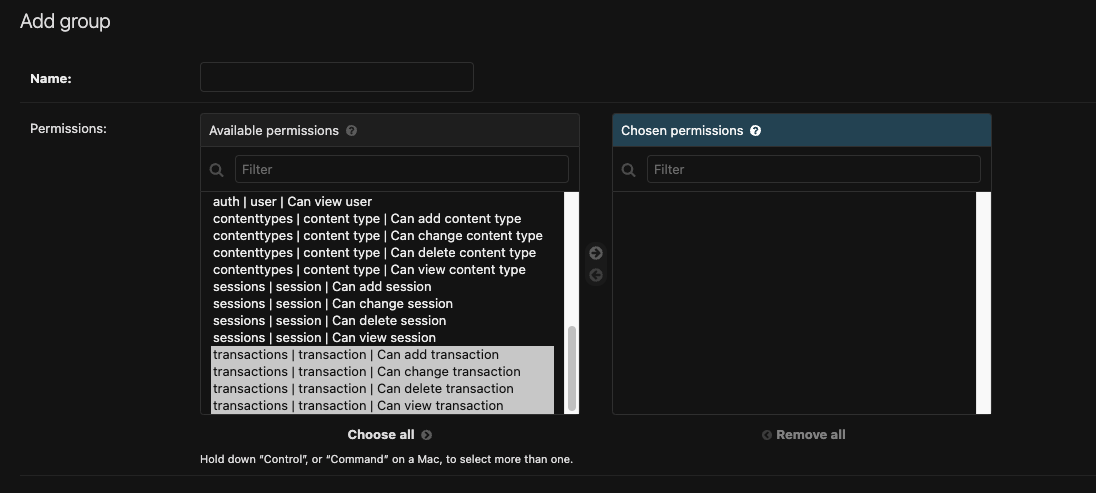
Our application web_project has Transaction App, and a model name is Transaction. So when we run manage.py migrate it will create default permissions for Transaction model.
Login in to Django admin using super user credentials to verify. It will add the as shown in below image.
Groups
django.contrib.auth.models.Group models are a generic way of categorizing users so you can apply permissions, or some other label, to those users. A user can belong to any number of groups. For more details refer
Group
A user in a group automatically has the permissions granted to that group. For example, if the group Client has the permission view_transaction, any user in that group will have that permission.
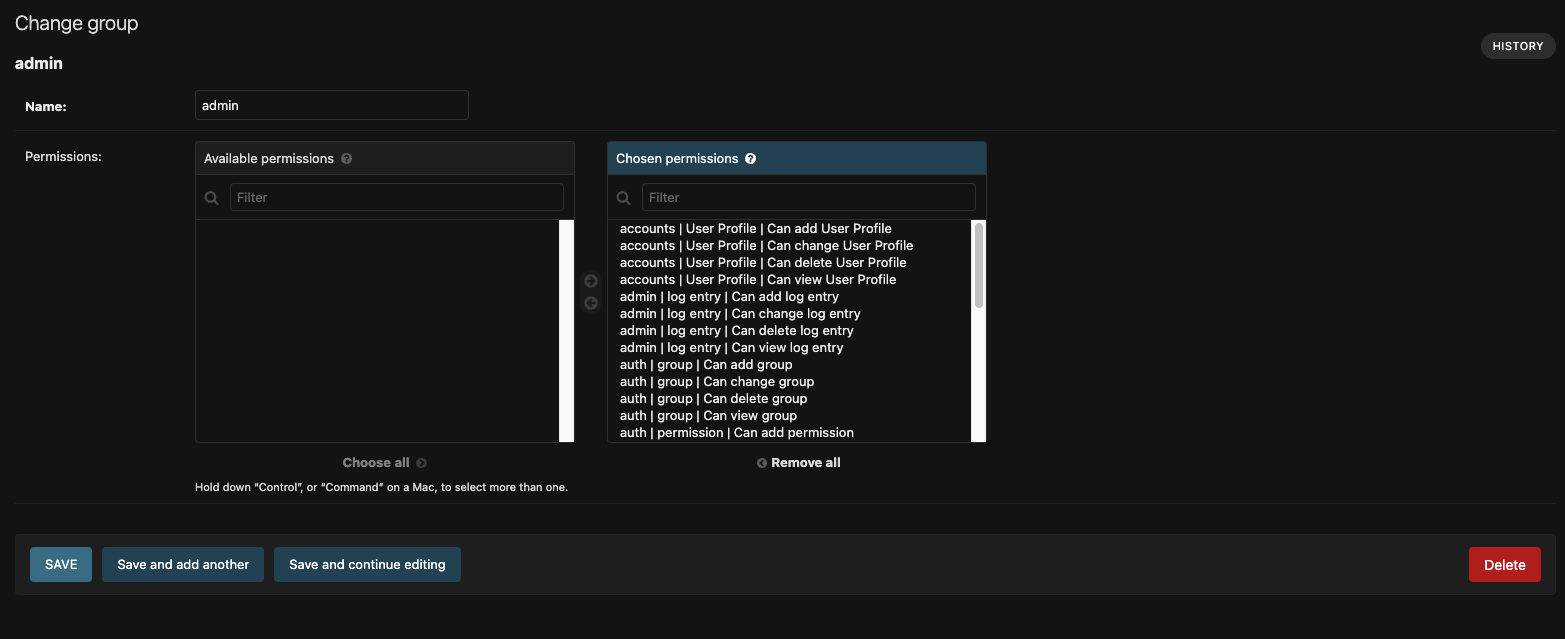
Sneat provides two groups Admin and Client with different permission:
-
Admin group:
- Can have access to all the pages (including users, roles and permission pages)
- Can have access to transaction app with add, change, delete and view permissions.
-
Client group:
- Can have access to most of the pages (excluding users, roles and permission pages)
- Can have access to transaction app with view permission only.

-
Admin user:
- Can have access to all the pages (including users, roles and permission pages)
- Can have access to transaction app with add, change, delete and view permissions.
-
Client user:
- Can have access to most of the pages (excluding users, roles and permission pages)
- Can have access to transaction app with view permission only.
Authorization
Authorization, in the context of Django, is the process of determining whether a user is allowed to perform a specific action based on the permissions they have.
- It is the enforcement of the defined permissions, allowing or denying access to resources and actions based on user credentials and the permissions assigned to them.
- For example, you can use the
@permission_requireddecorator to protect a view and allow only users with specific permissions to access it. - In the context of view classes or viewsets, you can use methods like
has_permissionto determine if a user is authorized to perform an action.
The PermissionRequiredMixin mixin
PermissionRequiredMixin is a mixin for class-based views in Django that allows you to restrict access to views based on specific permissions. It can be used to require users to have certain permissions before accessing a particular view.
Here's how you can use the PermissionRequiredMixin in your Django project:
- Import the necessary modules:
- Create a class-based view and inherit from
PermissionRequiredMixin: - Define the
permission_requiredattribute as a tuple of permission strings that the user must have:
from django.views.generic import TemplateView
from django.contrib.auth.mixins import PermissionRequiredMixin
from web_project import TemplateLayout
class AccessView(PermissionRequiredMixin, TemplateView): permission_required = (
"permission.view_permission",
"permission.delete_permission",
"permission.change_permission",
"permission.add_permission",
)
In this example, the view requires the user to have the following permissions:
view_permission, delete_permission, change_permission, and add_permission. Users must have all of these permissions to access the view.
By using the PermissionRequiredMixin with the permission_required attribute, you can restrict access to the AccessView based on the specified permissions. Users must have all the required permissions to access this view.
Example usage:
from django.views.generic import TemplateView
from web_project import TemplateLayout
from django.contrib.auth.mixins import PermissionRequiredMixin


"""
This file is a view controller for multiple pages as a module.
Here you can override the page view layout.
Refer to access/urls.py file for more pages."""


class AccessView(PermissionRequiredMixin, TemplateView):
    permission_required = ("permission.view_permission", "permission.delete_permission", "permission.change_permission", "permission.add_permission")
    # Predefined function
    def get_context_data(self, **kwargs):
        # A function to init the global layout. It is defined in web_project/__init__.py file
        context = TemplateLayout.init(self, super().get_context_data(**kwargs))

        return context
The permission_required decorator
permission_required. We're using class-based views in Sneat, so we will be using PermissionRequiredMixin.The @permission_required decorator in Django is a powerful tool for restricting access to views based on user permissions. It ensures that only users with specific permissions are allowed to access a particular view. This guide will walk you through the usage of the @permission_required decorator with example code.
Prerequisites:
- You have defined the necessary permissions in your Django application. Permissions are typically defined in the
models.pyfile using the Permission model. - You have assigned these permissions to user groups or individual users (For ex: Admin and Client as we did in permissions section). Permissions can be assigned via the Django admin interface or programmatically.
Decorator Usage
To use the @permission_required decorator, follow these steps:
- Import the decorator at the beginning of your Python file:
- Apply the decorator to your view function or class-based view:
app_labelis the label of the application where the permission is defined.codenameis the codename of the permission you want to check.login_url(optional, we're using LOGIN_URL option insetting.pyto set it.) is the URL to redirect to if the user doesn't have the required permission. If set to None, the user will see a "Permission Denied" message.raise_exception(optional) is a boolean that determines whether a PermissionDenied exception should be raised if the user lacks the required permission. If set to True, an exception will be raised; if set to False, the user will be redirected to the login URL.
from django.contrib.auth.decorators import permission_required@permission_required('app_label.codename', login_url=None, raise_exception=False)example usage
from django.views.generic import TemplateView
from web_project import TemplateLayout
from django.contrib.auth.decorators import permission_required

class MyRestrictedView(TemplateView):
    """
    A view that requires specific permissions to access.
    """

    # Apply the @permission_required decorator with the required permissions.
    @permission_required("myapp.can_access_view", login_url='/login/', raise_exception=False)
    def get(self, request, *args, **kwargs):
        # Your view logic here
        context = TemplateLayout.init(self, super().get_context_data(**kwargs))
        return context
In this example, the MyRestrictedView class uses the @permission_required decorator to require the can_access_view permission from our application. If a user doesn't have this permission, they will be redirected to the /login/ URL. You can customize the behavior by adjusting the login_url and raise_exception parameters.
By following these steps, you can easily control access to views based on user permissions in your Django project. For more details refer: The permission_required decorator
{{ perms }} Permissions
The currently logged-in user’s permissions are stored in the template variable .This is an instance of django.contrib.auth.context_processors.PermWrapper, which is a template-friendly proxy of permissions. For more details refer
Permission
- Evaluating a single-attribute lookup of as a boolean:
- Evaluating a two-attribute lookup of as a boolean:
{% if perms.foo %}{% if perms.foo.add_vote %}Example usage:
In Sneat's Transaction app, you can secure the transactions_list.html view using Django's built-in permissions and roles. This ensures that only users with the appropriate permissions can access this view.
- Admin can have
add_transaction, view_transaction, edit_transaction and update_transaction. - Client can have
view_transaction.
{% extends layout_path %}

{% load static %}
{% load i18n %}

{% block title %}Transactions{% endblock title %}

{% block vendor_css %}
{{ block.super }}
<link rel="stylesheet" href="{% static 'vendor/libs/datatables-bs5/datatables.bootstrap5.css' %}" />
<link rel="stylesheet" href="{% static 'vendor/libs/datatables-responsive-bs5/responsive.bootstrap5.css' %}" />
<link rel="stylesheet" href="{% static 'vendor/libs/datatables-buttons-bs5/buttons.bootstrap5.css' %}" />
<link rel="stylesheet" href="{% static 'vendor/libs/sweetalert2/sweetalert2.css' %}" />
{% endblock vendor_css %}

{% block vendor_js %}
{{ block.super }}
<script src="{% static 'vendor/libs/moment/moment.js' %}"></script>
<script src="{% static 'vendor/libs/datatables-bs5/datatables-bootstrap5.js' %}"></script>
<script src="{% static 'vendor/libs/sweetalert2/sweetalert2.js' %}"></script>
{% endblock vendor_js %}

{% block page_js %}
{{ block.super }}
<script src="{% static 'js/transactions-list.js' %}"></script>
<script src="{% static 'js/transactions-delete.js' %}"></script>
{% endblock page_js %}

{% block content %}


<!-- Transactions Toast -->
{% if messages %}
<div class="toast-container end-0 m-1 me-4">
  {% for message in messages %}
  <div class="toast {% if message.tags == 'success' %}bg-success{% elif message.tags == 'error' %}bg-danger{% else %}bg-warning{% endif %}" role="alert" aria-live="assertive" aria-atomic="true" data-autohide="true" data-bs-delay="2000">
    <div class="toast-body text-center text-white fw-medium">
      {{ message }}
    </div>
  </div>
  {% endfor %}
</div>
{% endif %}
<!--/ Transactions Toast -->

<!-- Transactions Table -->
<!-- permission required: view_transaction -->
{% if perms.transactions.view_transaction %}
<div class="row g-4 mb-4">
  <div class="col-sm-6 col-xl-3">
    <div class="card">
      <div class="card-body">
        <div class="d-flex align-items-start justify-content-between">
          <div class="content-left">
            <div class="d-flex align-items-end">
              <h3 class="mb-0 me-2">{{ transactions_count }}</h3>
              <small class="text-primary"></small>
            </div>
            <small>Total Transactions</small>
          </div>
          <span class="badge bg-label-primary rounded p-2">
            <i class="bx bx-transfer-alt icon-sm"></i>
          </span>
        </div>
      </div>
    </div>
  </div>
  <div class="col-sm-6 col-xl-3">
    <div class="card">
      <div class="card-body">
        <div class="d-flex align-items-start justify-content-between">
          <div class="content-left">
            <div class="d-flex align-items-end">
              <h3 class="mb-0 me-2">$ {{ paid_count }}</h3>
              <small class="text-primary"></small>
            </div>
            <small>Total Paid</small>
          </div>
          <span class="badge bg-label-success rounded p-2">
            <i class="bx bx-check icon-sm"></i>
          </span>
        </div>
      </div>
    </div>
  </div>
  <div class="col-sm-6 col-xl-3">
    <div class="card">
      <div class="card-body">
        <div class="d-flex align-items-start justify-content-between">
          <div class="content-left">
            <div class="d-flex align-items-end">
              <h3 class="mb-0 me-2">$ {{ due_count }}</h3>
              <small class="text-primary"></small>
            </div>
            <small>Total Due</small>
          </div>
          <span class="badge bg-label-warning rounded p-2">
            <i class="bx bx-stopwatch icon-sm"></i>
          </span>
        </div>
      </div>
    </div>
  </div>
  <div class="col-sm-6 col-xl-3">
    <div class="card">
      <div class="card-body">
        <div class="d-flex align-items-start justify-content-between">
          <div class="content-left">
            <div class="d-flex align-items-end">
              <h3 class="mb-0 me-2">$ {{ canceled_count }}</h3>
              <small class="text-primary"></small>
            </div>
            <small>Total Canceled</small>
          </div>
          <span class="badge bg-label-danger rounded p-2">
            <i class="bx bx-x icon-sm"></i>
          </span>
        </div>
      </div>
    </div>
  </div>
</div>


<div class="card">
  <div class="card-datatable table-responsive">
    <table class="datatables-transaction table">
      <thead class="border-top">
        <tr class="text-nowrap">
          <th></th>
          <th>Id</th>
          <th>Customer</th>
          <th>Transaction Date</th>
          <th>Due Date</th>
          <th>Total</th>
          <th>Status</th>
          <th>Actions</th>
        </tr>
      </thead>
      <tbody>
        {% for transaction in transactions %}
        <tr>
          <td></td>
          <td>{{ transaction.id }}</td>
          <td class="text-nowrap fw-medium text-heading">{{ transaction.customer|capfirst }}</td>
          <td class="text-nowrap">{{ transaction.transaction_date }}</td>
          <td class="text-nowrap">{{ transaction.due_date }}</td>
          <td class="text-nowrap">$ {{ transaction.total }}</td>
          <td>
            <div class="badge bg-label-{% if transaction.status == 'Paid' %}success{% elif transaction.status == 'Due' %}warning{% elif transaction.status == 'Canceled' %}danger{% endif %}">
              {{ transaction.status }}
            </div>
          </td>
          <td>
            <div class="d-flex align-items-center gap-1">
              <!-- permission required: edit_transaction -->
              {% if perms.transactions.edit_transaction %}
              <a href="{% url 'transactions-update' transaction.id %}" class="btn btn-icon btn-text-secondary waves-effect waves-light rounded-pill"><i class='bx bx-edit icon-md'></i></a>
              {% endif %}
              <!-- permission required: delete_transaction -->
              {% if perms.transactions.delete_transaction %}
              <a href="{% url 'transactions-delete' transaction.id %}" class="btn btn-icon btn-text-secondary waves-effect waves-light rounded-pill delete-transaction" data-transaction-username="{{ transaction.customer|capfirst }}"><i class="bx bx-trash icon-md"></i></a>
              {% endif %}
            </div>
          </td>
        </tr>
        {% endfor %}
      </tbody>
    </table>
  </div>
</div>
{% endif %}
<!--/ Transactions Table -->
<script>
var addTransactionBtn = '{% if perms.transactions.add_transaction %}' + true + '{% endif %}';

</script>


{% endblock %}
Navigation(Menu) Item Permission
Sneat provides built-in functionality to display menu-header, menu-tem and menu-group according to user/group permission.
vertical_menu.json and horizontal_menu.json file.
- Admin User: Can view Transaction, Roles & Permission and Users Apps in menu.
- Client User: Can view only Transaction App in menu.
permission attribute in a menu JSON to show menu headers, items, and groups based on user or group permissions. However, it won't provide protection for viewing or accessing URLs. If you want to control access to views based on permissions, you should use The PermissionRequiredMixin mixin.
-
To display menu-header (For vertical menu only) according to permission:
Result: User with
view_transactionpermission can view this menu-header.... { "menu_header": "Apps & Pages" "permission": "transactions.view_transaction", }, ... -
To display menu-item according to permission:
Result: Admin and Client user has permission
view_transaction, so they can view this menu-item.... { "url": "transactions", "name": "Transactions (CRUD)", "permission": "transactions.view_transaction", "icon": "menu-icon tf-icons bx bx-data", "slug": "transactions" }, ... -
To display menu-group according to permission:
Result: Admin user has permission
view_permission, so they can view this menu-group.... { "name": "Roles & Permissions", "icon": "menu-icon tf-icons bx bx-check-shield-check", "permission": "permission.view_permission", "slug": "app-access", "submenu": [ { "url": "app-access-roles", "name": "Roles", "slug": "app-access-roles" }, { "url": "app-access-permission", "name": "Permissions", "slug": "app-access-permission" } ] }, ...